Fermented Foods
Affordable Fermented Foods Ideas for Real Kitchens
Simple, budget-friendly fermented foods you can make at home—no fancy equipment, just real ingredients and a little patience.

Why Fermented Foods Belong in Every Kitchen
I still remember the first time I watched my yiayia pack shredded cabbage into a clay crock. It felt like a quiet ritual—salt, time, and trust. Fermentation isn’t a trend or a science experiment; it’s the original way of keeping a harvest alive through winter. And the beauty is, it doesn’t require a laboratory or a hefty budget. You already have what you need: vegetables, salt, water, and a little patience. In this article, I’ll walk you through the most affordable fermented foods you can make at home—no hype, just honest food you’ll actually eat.
The Basics: What You Actually Need (and Don’t Need)
Let’s clear up a common myth: you don’t need expensive fermentation weights, airlock lids, or even special jars. Here’s what I use in my own kitchen:.
- Mason jars or any clean glass jar with a tight lid
- A small glass or ceramic weight (a clean pebble works
- or even a smaller jar filled with water)
- Non-iodized salt (sea salt or kosher—iodine can interfere with fermentation)
- Filtered water (tap water with chlorine can inhibit the good bacteria)
- Vegetables—whatever is in season or on sale
That’s it. No starter cultures needed for most vegetable ferments—the naturally occurring lactobacillus on the veggies does the work. Just keep everything clean and submerged below the brine.
1. Sauerkraut: The Ultimate Budget Ferment
If you only learn one ferment, let it be sauerkraut. A single head of cabbage costs next to nothing and transforms into weeks of tangy, probiotic-rich kraut. Here’s the simplest method:.
| Ingredient | Amount |
|---|---|
| Green or red cabbage | 1 medium head (about 2 lbs) |
| Sea salt | 1.5 to 2 teaspoons (2% of cabbage weight) |
| Optional: caraway seeds, juniper berries | 1 teaspoon |
Shred the cabbage, toss with salt, and massage until liquid releases. Pack tightly into a jar, pressing down so the brine covers the cabbage. Weigh it down, cover loosely, and leave at cool room temperature (60–70°F) for 1–3 weeks. Check every few days and skim any scum. Refrigerate when it tastes good to you.
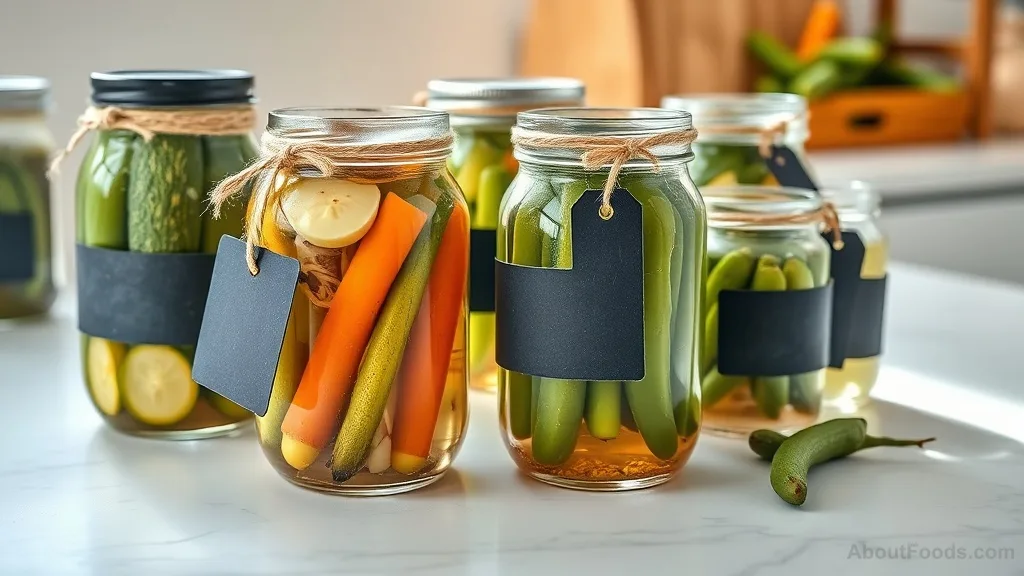
2. Quick Lacto-Fermented Pickles
Forget vinegar—lacto-fermented pickles use salt and time to create a crisp, tangy crunch. They’re cheaper than store-bought and so easy. Use cucumbers, carrots, green beans, or even watermelon rinds.
Basic brine: 2 tablespoons salt per quart of water. Fill a jar with your vegetables, add garlic, dill, and a grape leaf (for crunch), pour brine over, and weigh down. Ferment at room temperature for 5–14 days. Taste daily—they go from perfectly pickled to too sour quickly.
3. Homemade Yogurt from Scraps
Did you know you can turn a tablespoon of leftover yogurt into a whole new batch? All you need is milk. Heat a quart of milk to 180°F, cool to 110°F, stir in 1 tablespoon of plain yogurt with live cultures, and keep warm in a thermos or wrapped in towels for 6–12 hours. Strain through a cheesecloth for thick Greek-style yogurt. This costs a fraction of store-bought and uses up milk before it spoils.
4. Simple Vegetable Medley (Refrigerator Style)
This is my weeknight ferment—no need for a long wait. Chop carrots, cauliflower, radishes, and red onion, pack into a jar with garlic, bay leaf, and peppercorns, and cover with the same salt brine (2 tablespoons salt per quart water). Leave at room temperature for just 2–3 days, then refrigerate. It’s ready in a few days and stays crisp for weeks. Perfect for snacking or adding to salads.
5. Water Kefir (Suger-Free Option)
Many people assume fermented drinks require expensive kombucha starters. Water kefir grains can be obtained for free from a friend or bought cheaply. They ferment sugary water into a tangy, effervescent soda in just 24–48 hours. Use sugar, molasses, or coconut water, then flavor with ginger, lemon, berries, or herbs. It’s much cheaper than buying probiotic drinks, and the grains multiply, so you’ll never run out.
Where do I get water kefir grains?
Check local fermentation groups, ask friends, or buy them online from a reputable seller. They’re inexpensive and often shared for free.
Can I use honey instead of sugar?
Yes, but honey has antimicrobial properties that can slow fermentation. Use a mix of sugar and honey for best results.
How do I know it’s ready?
It should taste mildly sweet with a pleasant tang. Over-fermented kefir becomes vinegary and less fizzy.
Common Mistakes to Avoid
- Using chlorinated water—always use filtered or boiled-then-cooled water.
- Not submerging everything—mold grows on exposed surfaces
- so use a weight.
- Fermenting in a too-warm spot—aim for 60–70°F
- above 75°F risks off-flavors and spoilage.
- Tightly sealing the jar early on—lacto-fermentation produces CO2
- so burp the lid daily or use a loose lid.
- Throwing away scum—a light layer of kahm yeast (white
Fermentation Checklist
A final thought: fermentation teaches patience and gratitude. It connects us to a slower, more intentional way of eating. So start small—maybe with a single jar of sauerkraut—and watch how this simple craft becomes a part of your kitchen rhythm.
Rate this article
No ratings yet. Be the first to rate it.

Written by
Eleni Demetriou
Specialises in Greek cuisineEleni Demetriou runs a food blog called 'Olive My Love'. She photographs every meal for 20 minutes before eating.
Describe yourself in three words: Romantic, slow, loves golden hour.